自定义文章底部版权声明
在每篇文章末尾添加“本文结束”标记
字数统计和阅读时长(网站底部/文章内)
添加文章置顶功能
(14)Hexo博客NexT主题美化之自定义文章底部版权声明
参考文章
效果如下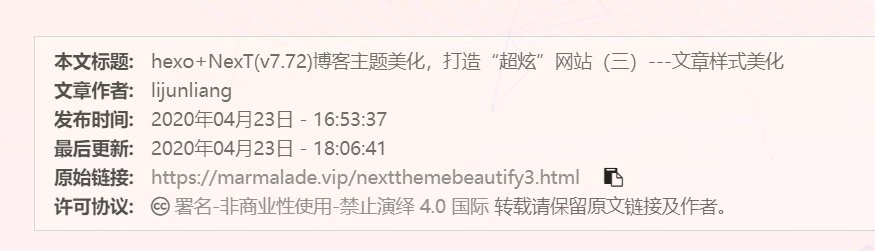
1.在目录themes/next/layout/_macro/下添加my-copyright.swig ,内容如下:
{% if page.copyright %} 本文标题:{{ page.title }}
文章作者:{{ theme.author }}
发布时间:{{ page.date.format("YYYY年MM月DD日 - HH:mm:ss") }}
最后更新:{{ page.updated.format("YYYY年MM月DD日 - HH:mm:ss") }}
原始链接:{{ page.permalink }}
许可协议: 署名-非商业性使用-禁止演绎 4.0 国际 转载请保留原文链接及作者。
{% endif %}2.在目录 themes/next/source/css/_common/components/post/ 下添加my-post-copyright.styl,内容如下:
.my_post_copyright { width: 85%; max-width: 45em; margin: 2.8em auto 0; padding: 0.5em 1.0em; border: 1px solid #d3d3d3; font-size: 0.93rem; line-height: 1.6em; word-break: break-all; background: rgba(255,255,255,0.4); } .my_post_copyright p{margin:0;} .my_post_copyright span { display: inline-block; width: 5.2em; color: #333333; // title color font-weight: bold; } .my_post_copyright .raw { margin-left: 1em; width: 5em; } .my_post_copyright a { color: #808080; border-bottom:0; } .my_post_copyright a:hover { color: #0593d3; // link color text-decoration: underline; } .my_post_copyright:hover .fa-clipboard { color: #000; } .my_post_copyright .post-url:hover { font-weight: normal; } .my_post_copyright .copy-path { margin-left: 1em; width: 1em; +mobile(){display:none;} } .my_post_copyright .copy-path:hover { color: #808080; cursor: pointer; }3.修改themes/next/layout/_macro/post.swig ,如下:在代码
{%- if post.reward_settings.enable %}
        {{ partial('_partials/post/post-reward.swig') }}
      {%- endif %
之后,新增如下代码:
<div> {% if not is_index %} {% include 'my-copyright.swig' %} {% endif %} </div>4.打开themes/next/source/css/_common/components/post/post.styl 文件,在最后一行增加代码:
@import "my-post-copyright"5.设置新建文章自动开启 copyright ,即新建文章自动显示自定义的版权声明,设置~/scaffolds/post.md文件,如下:
---
title: {{ title }}
date: {{ date }}
copyright: true #新增,开启
---
(15)在每篇文章末尾添加“本文结束”标记
在路径/blog/themes/next/layout/_macro中新建 passage-end-tag.swig 文件,并添加以下内容
<div>
    {% if not is_index %}
        <div style="text-align:center;color: #ccc;font-size:14px;">-------------本文结束<i class="fa fa-paw"></i>感谢您的阅读-------------</div>
    {% endif %}
</div>接着打开/blog/themes/next/layout/_macro/post.swig文件,在post-body 之后, post-footer之前添加,代码如下:
<div>
  {% if not is_index %}
    {% include 'passage-end-tag.swig' %}
  {% endif %}
</div>
然后打开主题配置文件(_config.yml),在末尾添加:
#文章末尾添加“本文结束”标记
passage_end_tag:
  enabled: true
效果:
(16)字数统计和阅读时长(网站底部/文章内)
首先安装插件:
$ npm install hexo-symbols-count-time --save然后修改主题配置文件如下:
symbols_count_time:
    separated_meta: true   #显示属性名称,设为false后只显示图标和统计数字,不显示属性的文字
    item_text_post: true   #显示属性名称,设为false后只显示图标和统计数字,不显示属性的文字
    item_text_total: true #底部footer是否显示字数统计属性文字(如站点总字数,站点阅读时长 ≈ 1 分钟)
    awl: 4     #计算字数的一个设置,没设置过
    wpm: 275  #一分钟阅读的字数
站点配置文件中添加:
symbols_count_time:
 #文章内是否显示
  symbols: true
  time: true
 # 网页底部是否显示
  total_symbols: true
  total_time: true
完成后并不能显示,而是
??
后来文章统计正常,但网页下方未变
勿急,等一会(可能要一天)会显示出来
(17)添加文章置顶功能
安装插件
卸载原来的插件,安装带置顶功能的插件 netcan/hexo-generator-index-pin-top: Index generator plugin for Hexo. Pin top version
$ npm uninstall hexo-generator-index --save
$ npm install hexo-generator-index-pin-top --save
使用
在需要置顶的文章中的 Front-matter 加入 top: true 即可。
优化
打开 /themes/next/layout/_macro下的 post.swig 文件,定位到 <div class="post-meta"> 下 (约 63 行),插入如下代码:
{% if post.top %}
     <i class="fa fa-thumb-tack"></i>
     <font color="7D26CD">置顶</font>
     <span class="post-meta-divider">|</span>
 {% endif %}
位置如图: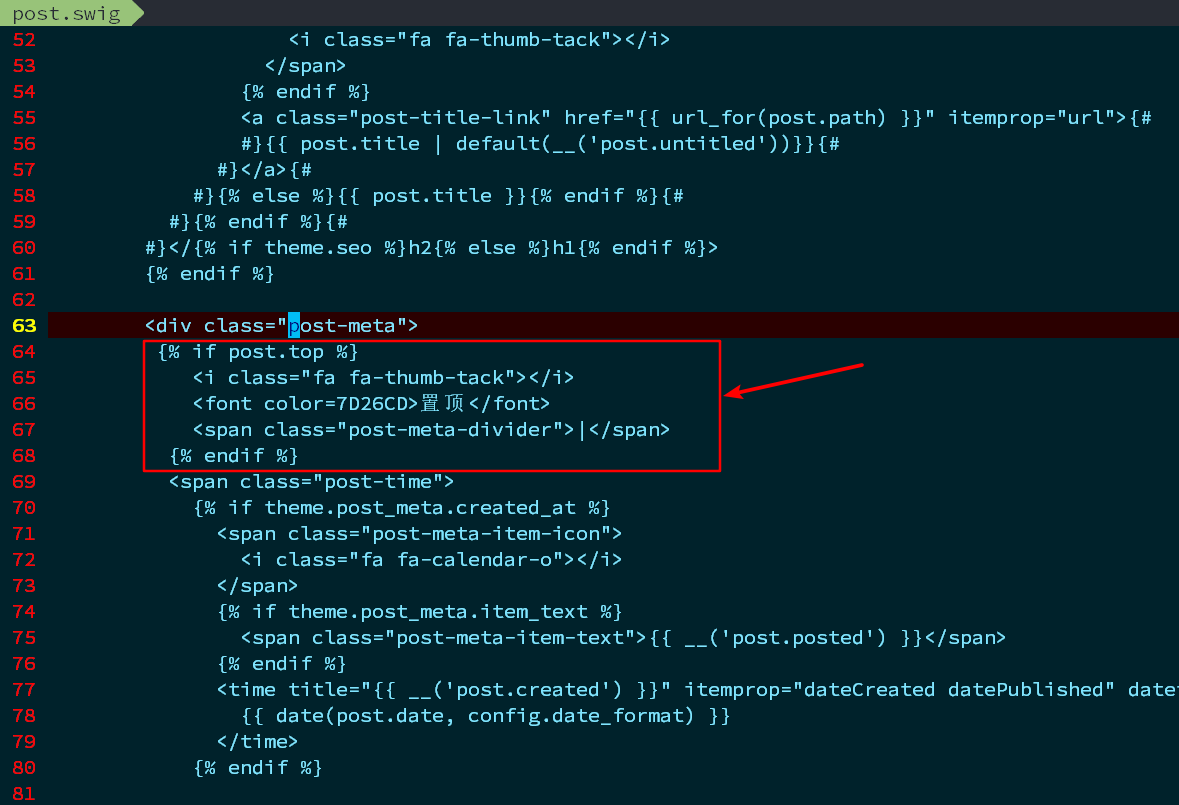
效果: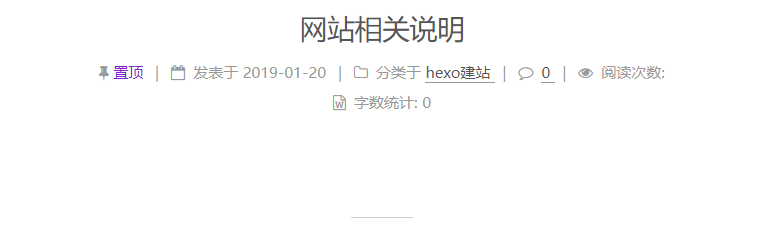
(18)添加阅读进度条
主题配置文件中改为true即可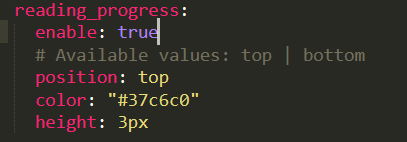
(19)添加代码复制块
代码块会展示出该效果
在之前创建的styles.styl末尾添加
// 复制按钮样式top调整
.highlight-wrap .copy-btn {
padding:
1px 6px;
top: 3px;
}
(20)全国哀悼日将网站变灰
方法:fn+f12打开调试面板,在body处添加
-webkit-filter: grayscale(100%)即可实现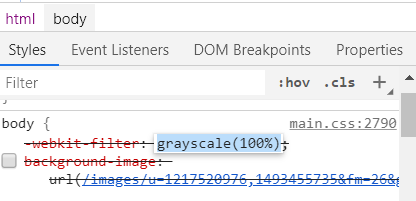
(21)点击爆炸效果
实现的效果图: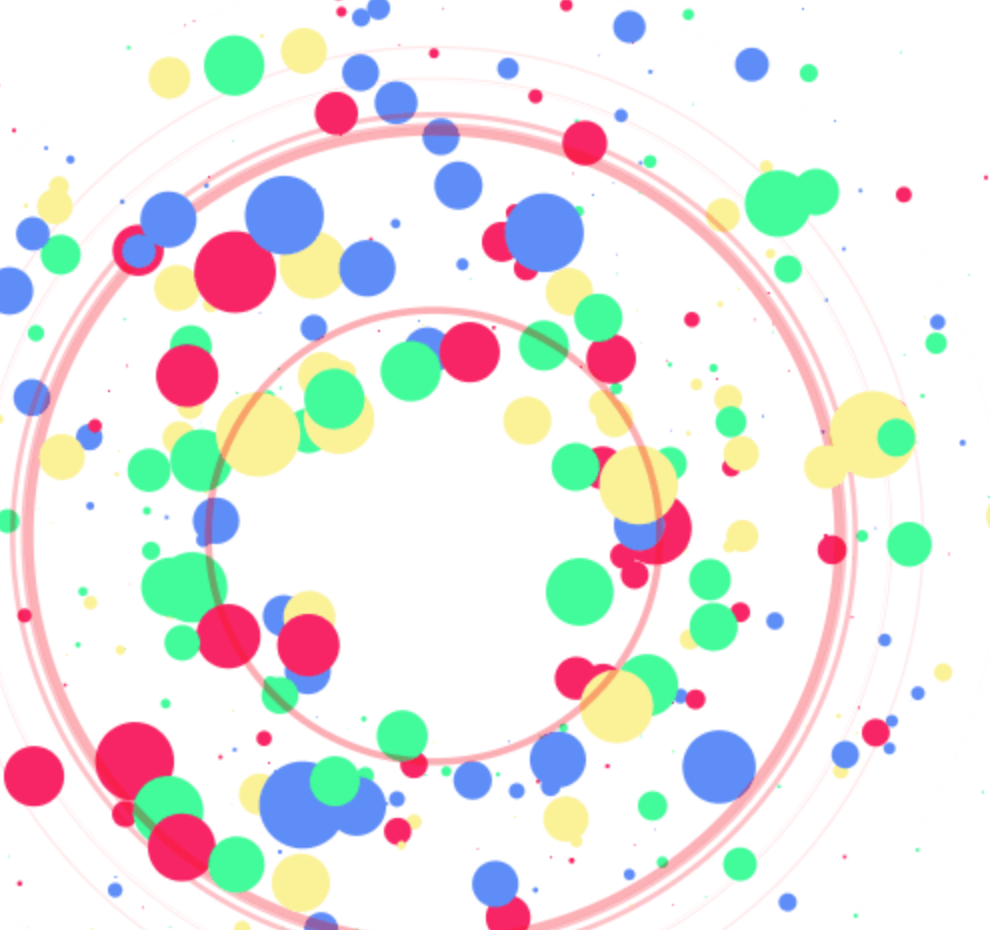
实现方法跟那个红心是差不多的,首先在themes/next/source/js/src里面建一个叫fireworks.js的文件,代码如下:
"use strict";function updateCoords(e){pointerX=(e.clientX||e.touches[0].clientX)-canvasEl.getBoundingClientRect().left,pointerY=e.clientY||e.touches[0].clientY-canvasEl.getBoundingClientRect().top}function setParticuleDirection(e){var t=anime.random(0,360)*Math.PI/180,a=anime.random(50,180),n=[-1,1][anime.random(0,1)]*a;return{x:e.x+n*Math.cos(t),y:e.y+n*Math.sin(t)}}function createParticule(e,t){var a={};return a.x=e,a.y=t,a.color=colors[anime.random(0,colors.length-1)],a.radius=anime.random(16,32),a.endPos=setParticuleDirection(a),a.draw=function(){ctx.beginPath(),ctx.arc(a.x,a.y,a.radius,0,2*Math.PI,!0),ctx.fillStyle=a.color,ctx.fill()},a}function createCircle(e,t){var a={};return a.x=e,a.y=t,a.color="#F00",a.radius=0.1,a.alpha=0.5,a.lineWidth=6,a.draw=function(){ctx.globalAlpha=a.alpha,ctx.beginPath(),ctx.arc(a.x,a.y,a.radius,0,2*Math.PI,!0),ctx.lineWidth=a.lineWidth,ctx.strokeStyle=a.color,ctx.stroke(),ctx.globalAlpha=1},a}function renderParticule(e){for(var t=0;t<e.animatables.length;t++){e.animatables[t].target.draw()}}function animateParticules(e,t){for(var a=createCircle(e,t),n=[],i=0;i<numberOfParticules;i++){n.push(createParticule(e,t))}anime.timeline().add({targets:n,x:function(e){return e.endPos.x},y:function(e){return e.endPos.y},radius:0.1,duration:anime.random(1200,1800),easing:"easeOutExpo",update:renderParticule}).add({targets:a,radius:anime.random(80,160),lineWidth:0,alpha:{value:0,easing:"linear",duration:anime.random(600,800)},duration:anime.random(1200,1800),easing:"easeOutExpo",update:renderParticule,offset:0})}function debounce(e,t){var a;return function(){var n=this,i=arguments;clearTimeout(a),a=setTimeout(function(){e.apply(n,i)},t)}}var canvasEl=document.querySelector(".fireworks");if(canvasEl){var ctx=canvasEl.getContext("2d"),numberOfParticules=30,pointerX=0,pointerY=0,tap="mousedown",colors=["#FF1461","#18FF92","#5A87FF","#FBF38C"],setCanvasSize=debounce(function(){canvasEl.width=2*window.innerWidth,canvasEl.height=2*window.innerHeight,canvasEl.style.width=window.innerWidth+"px",canvasEl.style.height=window.innerHeight+"px",canvasEl.getContext("2d").scale(2,2)},500),render=anime({duration:1/0,update:function(){ctx.clearRect(0,0,canvasEl.width,canvasEl.height)}});document.addEventListener(tap,function(e){"sidebar"!==e.target.id&&"toggle-sidebar"!==e.target.id&&"A"!==e.target.nodeName&&"IMG"!==e.target.nodeName&&(render.play(),updateCoords(e),animateParticules(pointerX,pointerY))},!1),setCanvasSize(),window.addEventListener("resize",setCanvasSize,!1)}"use strict";function updateCoords(e){pointerX=(e.clientX||e.touches[0].clientX)-canvasEl.getBoundingClientRect().left,pointerY=e.clientY||e.touches[0].clientY-canvasEl.getBoundingClientRect().top}function setParticuleDirection(e){var t=anime.random(0,360)*Math.PI/180,a=anime.random(50,180),n=[-1,1][anime.random(0,1)]*a;return{x:e.x+n*Math.cos(t),y:e.y+n*Math.sin(t)}}function createParticule(e,t){var a={};return a.x=e,a.y=t,a.color=colors[anime.random(0,colors.length-1)],a.radius=anime.random(16,32),a.endPos=setParticuleDirection(a),a.draw=function(){ctx.beginPath(),ctx.arc(a.x,a.y,a.radius,0,2*Math.PI,!0),ctx.fillStyle=a.color,ctx.fill()},a}function createCircle(e,t){var a={};return a.x=e,a.y=t,a.color="#F00",a.radius=0.1,a.alpha=0.5,a.lineWidth=6,a.draw=function(){ctx.globalAlpha=a.alpha,ctx.beginPath(),ctx.arc(a.x,a.y,a.radius,0,2*Math.PI,!0),ctx.lineWidth=a.lineWidth,ctx.strokeStyle=a.color,ctx.stroke(),ctx.globalAlpha=1},a}function renderParticule(e){for(var t=0;t<e.animatables.length;t++){e.animatables[t].target.draw()}}function animateParticules(e,t){for(var a=createCircle(e,t),n=[],i=0;i<numberOfParticules;i++){n.push(createParticule(e,t))}anime.timeline().add({targets:n,x:function(e){return e.endPos.x},y:function(e){return e.endPos.y},radius:0.1,duration:anime.random(1200,1800),easing:"easeOutExpo",update:renderParticule}).add({targets:a,radius:anime.random(80,160),lineWidth:0,alpha:{value:0,easing:"linear",duration:anime.random(600,800)},duration:anime.random(1200,1800),easing:"easeOutExpo",update:renderParticule,offset:0})}function debounce(e,t){var a;return function(){var n=this,i=arguments;clearTimeout(a),a=setTimeout(function(){e.apply(n,i)},t)}}var canvasEl=document.querySelector(".fireworks");if(canvasEl){var ctx=canvasEl.getContext("2d"),numberOfParticules=30,pointerX=0,pointerY=0,tap="mousedown",colors=["#FF1461","#18FF92","#5A87FF","#FBF38C"],setCanvasSize=debounce(function(){canvasEl.width=2*window.innerWidth,canvasEl.height=2*window.innerHeight,canvasEl.style.width=window.innerWidth+"px",canvasEl.style.height=window.innerHeight+"px",canvasEl.getContext("2d").scale(2,2)},500),render=anime({duration:1/0,update:function(){ctx.clearRect(0,0,canvasEl.width,canvasEl.height)}});document.addEventListener(tap,function(e){"sidebar"!==e.target.id&&"toggle-sidebar"!==e.target.id&&"A"!==e.target.nodeName&&"IMG"!==e.target.nodeName&&(render.play(),updateCoords(e),animateParticules(pointerX,pointerY))},!1),setCanvasSize(),window.addEventListener("resize",setCanvasSize,!1)};打开themes/next/layout/_layout.swig,在上面写下如下代码:
{% if theme.fireworks %}
   <canvas class="fireworks" style="position: fixed;left: 0;top: 0;z-index: 1; pointer-events: none;"></canvas>
   <script type="text/javascript" src="//cdn.bootcss.com/animejs/2.2.0/anime.min.js"></script>
   <script type="text/javascript" src="/js/src/fireworks.js"></script>
{% endif %}
打开主题配置文件,在里面最后写下:
# Fireworks
fireworks: true